

How to germinate seeds, methods and solutions, when and where to do it.
Seed germination methods and techniques
Germination begins the life of your plant, so it's critical to understand precisely how to do it. There are many methods for germinating marijuana seeds, some more effective than others.
This guide will discuss the many ways to germinate your seeds and some strategies to ensure you get the best results possible.
What should you know about germination?
-
Start with the seed
-
Planning for germination
-
3 Easy Ways to Sprout Your Seeds
-
Other germination methods
-
Germination environment
-
Planting your germinated seeds
Start with the seed
Like all plants, you start from the seed. What looks like a pebble is actually an entire plant conveniently stored with a few days' supply of food to sustain it. During germination, this food is converted into sugars that the plant uses to break through its shell and form its roots. From that point on, the young seedling depends on its environment to provide the nutrients it will need to survive.

Sprouted seeds
Germination brings a seed out of its dormancy and triggers the growth process. A seed will begin to sprout once it receives enough moisture. At that point, it will increase in size and open its shell. A germinal opening forms and a root will emerge, which will help the plant absorb nutrients from the soil. Nature and gravity ensure that the root grows downwards and the stem grows upwards, creating a young seedling that can survive light and soil.
Since all marijuana grows from a cannabis seed, many people want to know how to identify a healthy seed. Honestly, it's hard to tell whether a plant will be healthy based on its seed alone. There are, however, some telltale signs. In general, a light green, white, or very dark green marijuana seed may have difficulty germinating well. But this does not always reflect the result of the implant and it is always worth a try.
If you can't use all your seeds, store them in a cool, dark, dry place while you can. A refrigerator is ideal.
Planning for germination
Seeds are designed to germinate, but are more likely to do so if given an ideal environment . There are many germination methods, but they all require:
-
Moisture to help the seed expand and break through its shell
-
Minimal interference so delicate structures are not accidentally broken
-
Temperatures imitating spring 20° -22°
If you remember these three things, your germination attempts are more likely to be successful .

The first leaves of a seedling after the cotyledons
It goes without saying that germination success is important. Your seed is the foundation for your plants, which is why many successful growers choose to start with high -quality seeds . You can also improve your germination attempts by using seed boosters, greenhouses and germination media such as jiffy disks.
3 Easy Ways to Sprout Your Seeds
The best germination method is the one that works for you, and if you're like me, you'll want something simple and natural. My favorite way to germinate seeds is a 24 hour soak followed by soil germination, but something else might work better for you plus for obvious reasons it carries a fair failure rate. Here are three of the easiest ways to germinate seeds.
Germinate the seeds directly in the soil
Plant your seeds in the ground where you intend to grow is the most common albeit not the most successful method for germinating marijuana seeds. This method is perfect for ensuring that young seeds have minimal interference as the fragile root is protected by the soil. It is also the most natural way to grow marijuana plants.

A seed just sprouted in the ground
When using soil, make sure you use the right type first. Preferably use lightly fertilized, new potting soil . It should have a PH of around 5.5/6.5. This type of soil will have spores and minerals that help young marijuana plants thrive. Do not add nutrients at the beginning, the potting soil has enough nutrients for about two weeks of the plant's life. If you add more nutrients, you risk killing your seedlings due to nutrient overdose .
To prepare the soil for the seed, push your finger into it to create a small hole up to 1.5 cm deep. You can also use a pen or pencil. Place a seed in the prepared hole and cover it with soil. If you have already germinated, the seed will have a root: place the root facing down (more on this later). After covering the seed with soil. So be careful this means pushing it further down inevitably as you water it.
Use a plant sprayer to moisten the soil and place the pots under a grow light. Do not use a cold windowsill, because the temperature is not high enough for germination. The temperature _ of the soil should be 22 °.
Continue to monitor your soil to make sure it stays moist. Within a week (or a minimum of 4 days) you should start to see stems emerge from the soil. Now you have a map ! Once your plants are 5 to 10 centimeters tall, transplant them into a larger pot. Your plant will now have many roots that will support it for the rest of its life.
Germinate the seeds in water
Germinating in water may seem like a bad idea, as there is more water and light than recommended when using this method, but it works! It is around 90% effective. The "trick" is to not leave the seeds in the water for too long. Usually, 24-48 hours is enough for the seeds to show their tails, but you can soak them for up to 7 days without too much worry.
However, we always recommend using this method only when you have good experience. We can instead tell the novice that soaking seeds for a few hours before putting them away to germinate in a safer place (germination disks or cubes) could help the seed to germinate because it softens the hardest part of the seed.

When germinating in water, the seeds will sink to the bottom once they are soaked
Water germination is helpful because it ensures there is the right amount of moisture to begin sprouting. If done for a short time, it can help break the shell, releasing the plant before your eyes. In water germination shortens the process making it easier for the plant rather than having to push through the soil. It is also true that light damages the roots and this is a fundamental point for choosing this method.
To sprout with water, fill a glass with tap water and let it come to room temperature for a few hours. The temperature should be around 18°. Do not add nutrients. Place 2 to 3 cannabis seeds in the water and observe any changes. Fill the glass with fresh water every other day while maintaining its temperature.
After about 2 to 4 days the seeds should start to split. You can place your seeds in the soil anywhere, but once the roots are 3 to 5 mm (0.1 to 0.2 inches) long, they need to be planted.
As much as I prefer to germinate my seeds in water, it has an additional disadvantage. At some point, you will have to handle your seeds and that is risky. Germinating seeds are delicate and the roots are particularly fragile. If you damage them in any way, your plant may not develop well. Be very careful when placing the sprouted seed into the soil and, if possible, place the root side down.
Germinate with cotton pads or absorbent paper
Another easy way to germinate your seeds is to use cotton pads or paper towels. This is a common way to do it because cotton pads or paper towels can keep the seeds moist and protected. While cotton balls (or balls) are best for this method, inexpensive, non-porous paper towels will also work. Just make sure they're simple, single-ply paper towels—cloth-like ones might cause your roots to grow into the towel.
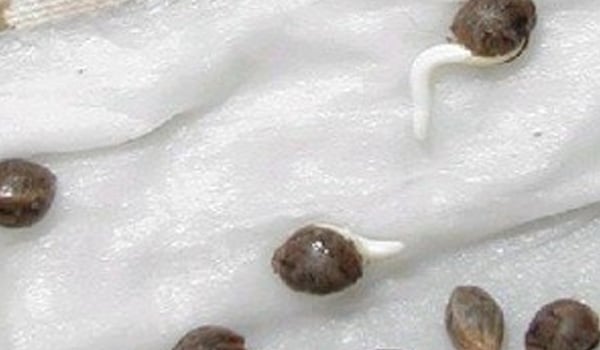
The seeds germinated between the cotton swabs showing their first tail
To germinate using cotton pads, place a few seeds between two cotton pads and moisten with a plant sprayer. When using a paper towel, place the seeds between two paper towels and store the towel-lined seeds between two plates, under an inverted bowl, or in a plastic bag. Keep the temperature around 22° and (once again) do not place the seeds on a windowsill. In about 2-5 days, the seeds will begin to split and a small root should appear. Place them in the soil when they are 3-5mm long.
Like the water method, germinating this way has its risks. If you're not careful, you can damage the fragile roots while carrying them into the soil. You can also tangle the root in the wet paper towel if you are not extremely careful. Use gloved fingers or tweezers to move delicate shoots, and don't let the root grow too long before moving it into the soil.
Other germination methods
Water, soil, and cotton pads or paper towels are the easiest ways to germinate your seeds, but they're not the only ones. You can also use germination cubes or discs. Simply drop the seed, add water and wait for it to germinate. They are equally successful, but eliminate the risk of damaging the root when transporting a young shoot to its final home. Below are two types of starting materials that can safely germinate your seeds.
Seed germination in rock wool
Rockwool provides the perfect environment for seed germination. It is mineral wool made from volcanic rock and other materials (such as basalt and limestone). Rock wool is made by man by fusing its ingredients into molten lava which is quickly spun into threads. These threads are then compacted, cured and cut.
Rockwool is an ideal growing environment, but will need to be modified slightly for marijuana plants. First of all, you will need to lower the pH as Rockwools have a pH of 7.0, which is too high for germination. To lower the pH, soak the Rockwool cubes in water for at least a day with a pH of 5.5, this will lower the pH.

A seed that sprouts in rock wool
It should also be noted that there are some drawbacks to using rock wool. Since it doesn't occur naturally, it's not the best for the environment. It's also not great for your health; wear gloves and cover your mouth and eyes when handling this stuff.
Aside from the additional steps involved (like adjusting the pH) the material is very affordable and easy to find. Since it does not require soil, this method is ideal for those who intend to do so grow in hydroponics but of course it is also suitable for subsequent planting in the ground.
Germination of seeds in Jiffy peat pads
Jiffy disks are peat pellets, another way to germinate seeds without the risk of damaging young roots. Peat pellets are made from compressed peat, partially decayed plant matter and are simply delicious for young plants. The pellet expands when water is added, forming a container of nutrient-dense soil around the germinating seeds.
Unlike rock wool, peat is already optimized for cannabis germination. It has a pH of 5.5, so you don't have to worry about making any changes. The only preparation required is to soak the pellet in water. Once the roots become visible (popping out of the peat), simply move the entire pellet into soil, rockwool or coco, where it will continue to grow. This type of germination is not recommended for hydroponic cultivation.

A seed germinated in a ball of peat
Peat pellets have a good germination rate, are easy to use and are suitable for beginners. They are also ideal for cloning . I recommend the Jiffy brand.
Germination environment
In addition to the material used to germinate your seeds, the growing environment will play a huge role. Your seeds will need the correct temperature and humidity levels to germinate into a strong, healthy plant. Below are some tips for creating the perfect germination environment.
How to water sprouting seeds
Watering is essential throughout the life cycle of cannabis, and germination is no exception. Not enough water and your seeds won't germinate, too much and the root won't survive. Excess water retains oxygen from the roots and can attract mold, which is why you need to be very careful not to overwater.
When germinating indoors using soil or another growing medium it is relatively easy to monitor water levels. You should water your seed until you see water dripping from the bottom (and no more). Even though the seedling can't absorb that much water, it will evaporate quite quickly, so you need to make sure there's always enough around. If you water it until it reaches this point, it should provide enough moisture for a few days.
Lighting and temperature
Like water, lighting is essential for a cannabis plant. In a mature plant, light allows the plant to form sugars from carbon dioxide and water. The plant then uses those sugars to fuel its growth, something we humans call photosynthesis.
Can Luci be used after germination?
For a germinated seed, lighting is also important as long as it provides heat, which a seed needs in the beginning to open its shell and send its root into the earth. The best way to give your seeds the temperature it needs is with fluorescent lights. (color temperature of 6500K). Fluorescent lights are ideal because they don't use too much energy or give off too much heat. You can place them as close to a young plant as possible, and while your sprout won't need them at this point, it will as soon as those first leaves start poking through the top of the soil.
You can't use them for growth but for germination they work well. You can also use a heat mat , this heats the seeds from the bottom rather than the top and you can also use it in the early germinated seed stage.
Keep soil temperatures around 75° Seeds germinate best in warm, humid temperatures, similar to spring. To create a humid environment, wrap plastic wrap around your pot. Just remember to remove the cling film the moment you see shoots emerging from the soil. If the soil, water or anything else you are growing in is warmer than 75 degrees, move the lamp away from the plant. Dry air won't kill seedlings, but if you can reduce it, even better.
Where to germinate seeds
When you plan your outdoor cultivation and you receive your seeds , it is best to germinate them indoors . This is because it is much easier to maintain the correct temperature, water levels and light exposure inside. Even if you plan to grow your plants outdoors, you shouldn't try to start them outdoors (unless absolutely necessary). Outside you have to worry about rain, clouds and many other things that could prevent your seeds from germinating. You will also have to wait until the final frost has passed, which means your growing season may be later than if you started seeds indoors. Starting indoors gives you a head start and your plants a better chance of survival.

If you still plan to sprout outdoors, choose a location that will support the plant throughout its life. You won't move the plant, so choose wisely. Plant the seeds when corn is usually planted in your area. Dig 6x6x6 holes at least 1 meter apart and fill them with soil. This will give the seeds enough nutrients to get started. Then, dig a small hole a quarter inch deep in the potting soil and drop the seed. Soak that soil with water and water again in a few days if the weather is warm enough. You can use greenhouses to protect your seeds and keep the area warm, but be careful not to leave them in too long – the young plants will need the light once they break through the soil.
There is, of course, an advantage to starting seeds outdoors if you plan to grow them outdoors. Your plant will have more time to adapt to its environment and will be less likely to experience shock when moved outdoors. So it might be worth it if you know what you're doing. Just remember to leave plenty of room for your plants (those little seeds can grow quite large), know the weather conditions in your environment, keep an eye out for animals that might eat your seeds, and use potting soil to provide the right amount of nutrients .
Planting your germinated seeds
Once your seeds have germinated, they should be planted. If you have used a germination method that requires moving the shoots, do so carefully, as the taproot is very fragile. You don't have to touch it. If you touch or break it, it may survive, but it will definitely stunt the growth of your plant.

When planting, let the white root fall downwards. It should be placed approximately 3/5cm into the growing medium (up to your knuckles). The top of the seed should be just below the surface. Cover lightly and wait about a week (10 days maximum) for the seedling to break through the soil. It may emerge the same day, but if it hasn't appeared within 10 days, it probably hasn't survived.
If your seed is accidentally planted upside down, don't worry. Nature has a way of working on its own. As long as there is enough room for roots to grow eventually, they will. Give it some time and let it do its thing!
Germination doesn't have to be difficult. Are you ready to start growing? It all starts with the right seeds. Our high quality seeds will enhance your germination efforts.
Find more information on germination and cultivation , study, learn and become a professional grower
All information contained is for informational and educational purposes only. We urge all users not to make any practical use of this information in connection with cannabis seeds. In fact, let us remember that:
In Italy the cultivation of cannabis seeds is prohibited (Art. 28 and 73 of Presidential Decree 309/90) if you do not have a specific authorization (Art. 17 Presidential Decree 309/90)
Therefore, cannabis seeds may be used exclusively for collecting purposes and for genetic preservation and are marketed with the reservation that they are not used by third parties in conflict with the law. Cannabis seeds are excluded from Presidential Decree 309/90, which means that they are not to be considered narcotic substances (L. 412 of 1974, Art. 1, Paragraph 1, Letter B; New York single convention on narcotics of 1961 and table 1 Ministry of Health decree 11 April 2006).